-
Ministerios de Amor Orphanage
Hello everyone! In June we (Daniel Powell and Helen O’Connor) have been given an opportunity to travel to Mexico City with a team of up to 15 people from Southgate Church in Fort Collins, Colorado to assist a local church, Restauracion Nueva Jerusalen Church , in renovating a local orphanage run by Ministerios de Amor…
-
First Fruits
Back in April, a church friend of mine offered for me to join a new Bible Study group that he was calling First Fruits. The meaning was tied to the idea that we would be meeting at 6:30am every single day to give the first of our day to God in studying the Bible, worshiping,…
-
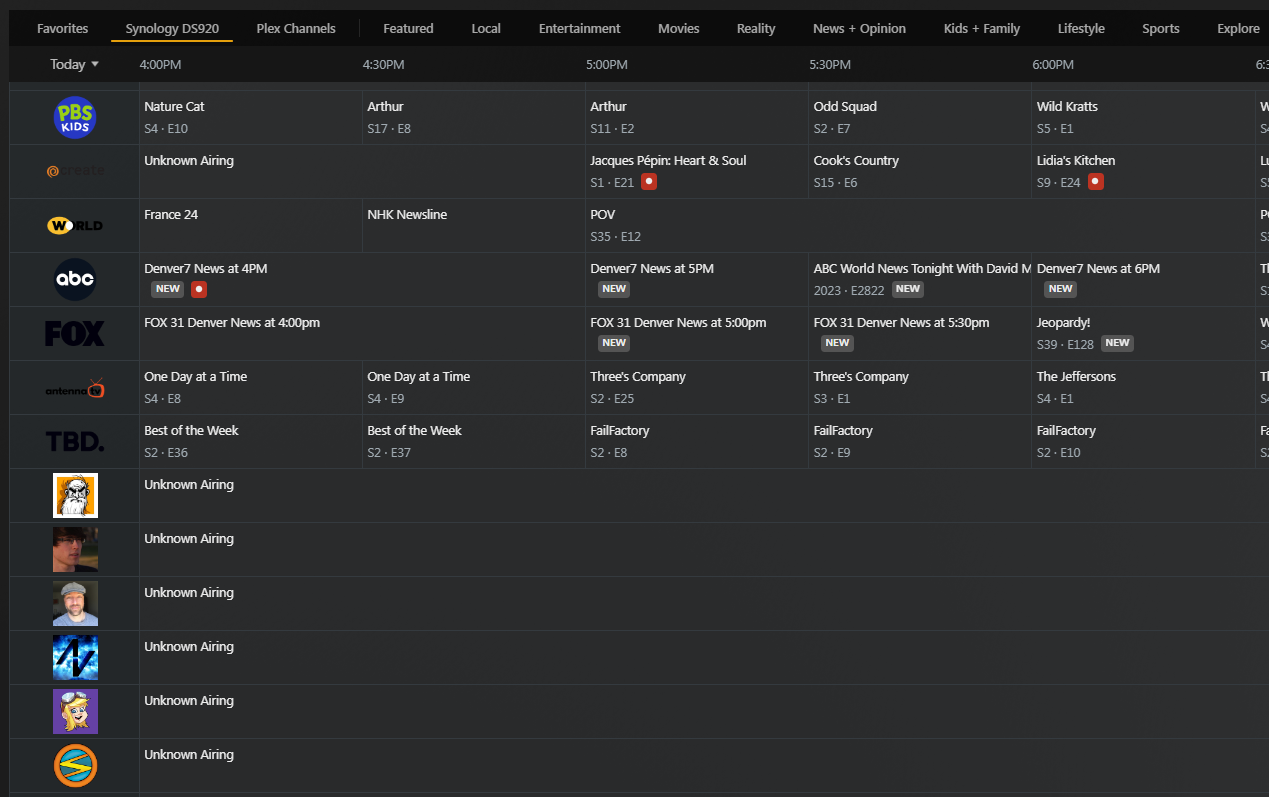
Live TV Tuners, Twitch, Plex, and screwing over even more Subscription Services
I have a lifetime subscription to Plex. I’ve had it for at least eight years. It’s cool! It lets me watch IPTV (built-in) and even has the option to connect to digital tuner+antenna combos on my network. I mean, I saw this “HDHomeRun” device I could buy on Amazon a couple of years ago and…
-

Untrodden Snow
When I was a child, the snow would fall all pure and deep and white.
-
New Look
It’s 2023. And WordPress has its annual theme update thing. I had a thought – how about something a bit new to play with? Let’s see how far it’s come in 3 years since I updated to the twenty-twenty theme back in probably 2019? Sure ’nuff. It’s not fantastic, but it’s interesting! I may fiddle…
-
Alternates
I just re-watched for the umpteenth time Rymdreglage‘s video where they change their name and call it Ninja Moped. It’s stupidly quirky and dumb and the worst thing ever, but it hits that place that tickles my love for weird things. Given that I like random name generators (even “analog” ones like this) a whole…
-
Plex, Synology, Xfinity and Me
So if your router doesn’t have access to this DNS Rebind Protection business, but you’re still seeing the “Unable to claim” error and you’ve tried everything, see about manually setting the DNS configuration of your actual server machine; not just hoping it will use the ones in your modem or router like it’s supposed to.
-
Minecraft – Upgrading to a 1.16 Server
Yeah, it’s a big deal with the nether update. Lots of gold farms, lots of new areas, and people are excited to see everything. However, care must be taken when upgrading to Minecraft 1.16. Lots of posts and videos have been made on how to upgrade a singleplayer world, but even more care must be…
-
Shaders in MultiMC Minecraft
Gathering all of the resources of the Internet, I finally pinned down the technique to install an Optifine shader in an instance of Minecraft from the MultiMC launcher. Specifically since I started playing again in a major way from v1.14.4, installing mods is not as simple as it used to be, and Optifine is no…
Got any book recommendations?